Service

Service and Return

The service is the only stroke where everything is dependent on the player who implements the stroke, and it includes the choice of position. Below you will find an analysis of where to best position the serve in order to allow yourself time to get into your next position.

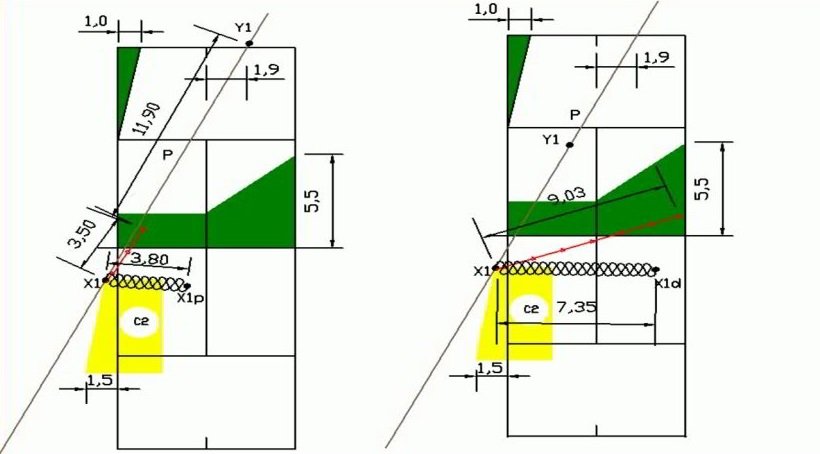
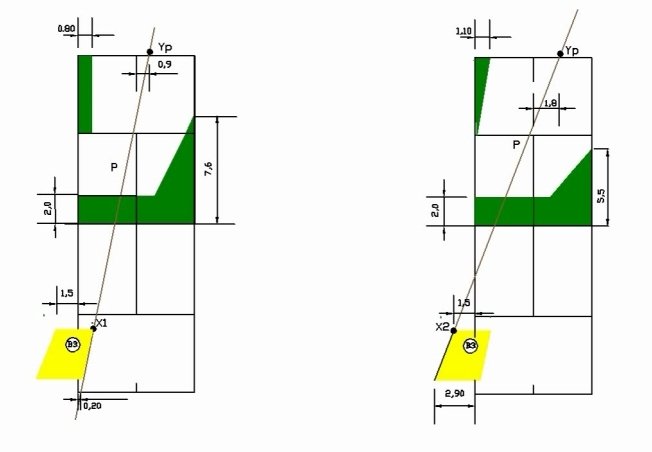
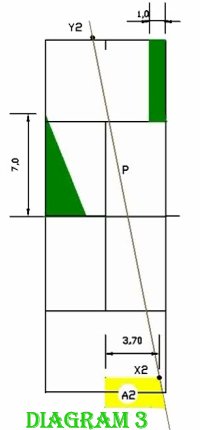
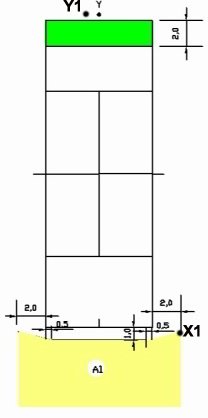
Tennis rules restrict the serving player to be between the center and the sideline. The player’s movement from the center to the sideline leads to a change of the ball’s direction by only 1.0 m. The distance between the ball’s direction is always constant, that is to say the distance between the player’s position and ball’s directions is constant. The position at the court’s corner has to be excluded. Why?
Because:

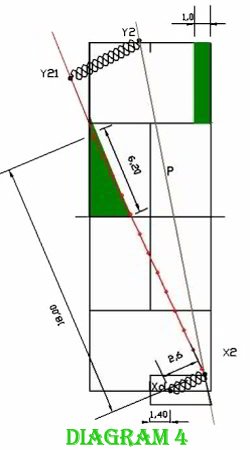
  • from there the player can not take the advantage since the opponent will change his position. There is no element of surprise. After every 1.0 m movement toward the sideline of the player that serves the receiver has to must move 0.25 m (1 foot) towards sideline as well.
  • when the server is at the court’s corner, his court is “open” and practically the server does not have time to reach the ball if his/her opponent directs it to the other side of his/her half of the court.

Where is the best position for service implementation?

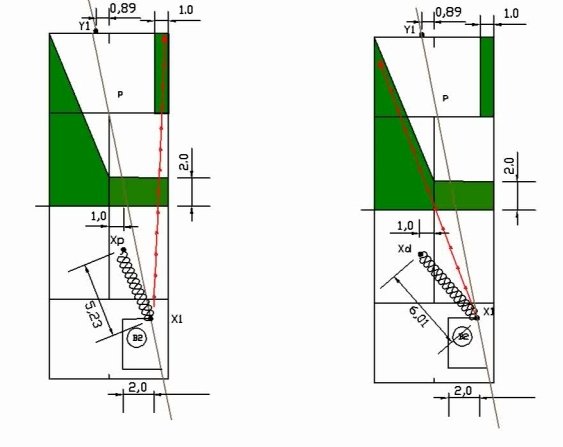
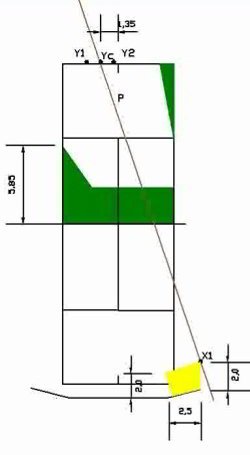
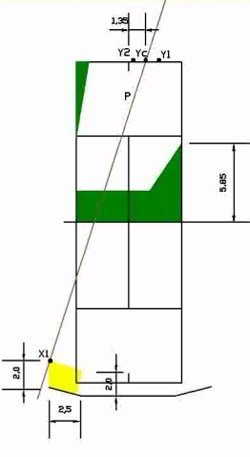
Everywhere you will find recommendations to direct the ball in the way that the ball is the most difficult for your opponent return or implement a winning shot. However, I have added one more recommendation. When all the ball’s directions have the same advantages, place the ball in the direction that best allows you to be closest to the next position you want to be in after the stroke.

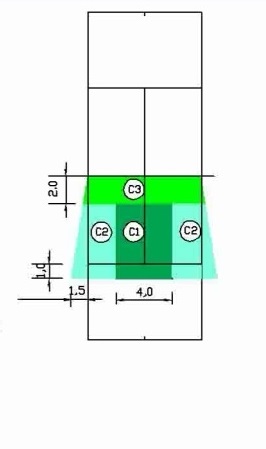
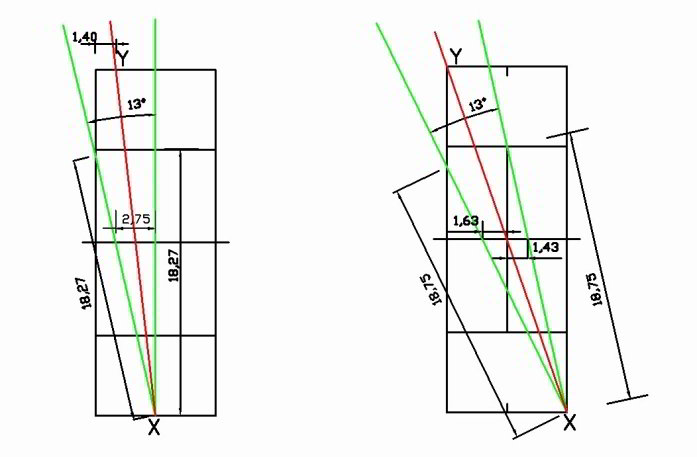
In this case, the position which is located about a meter from the court’s center is the recommended position for the service implementation.

Where is the best receiver’s position?

In order to make a correct choice, you must consider the following:

You have to make your choice for court position in two directions:

  • before the baseline, on the baseline or after the baseline, and;
  • how far from the court’s corner on the direction to the court’s center or out to the sideline.

The choice of the position with regards to the distance of the player to the net is individual because it is dependent on:

  • the opponent’s performance and speed reactions;

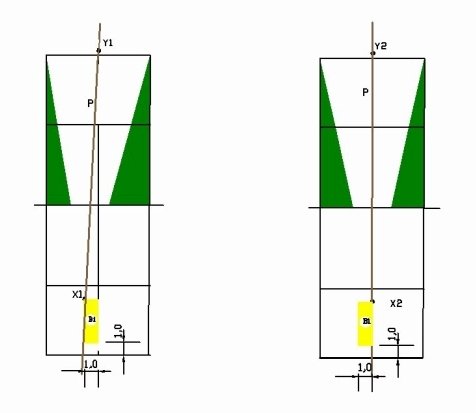
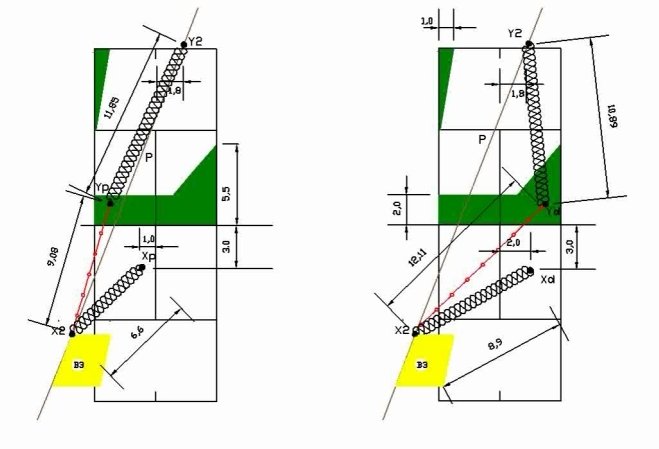
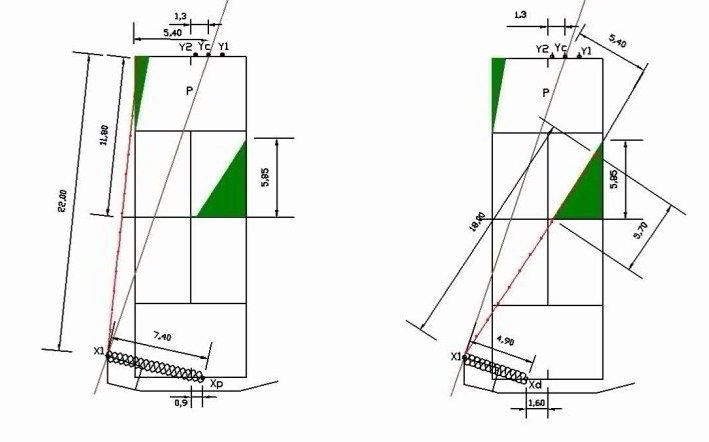
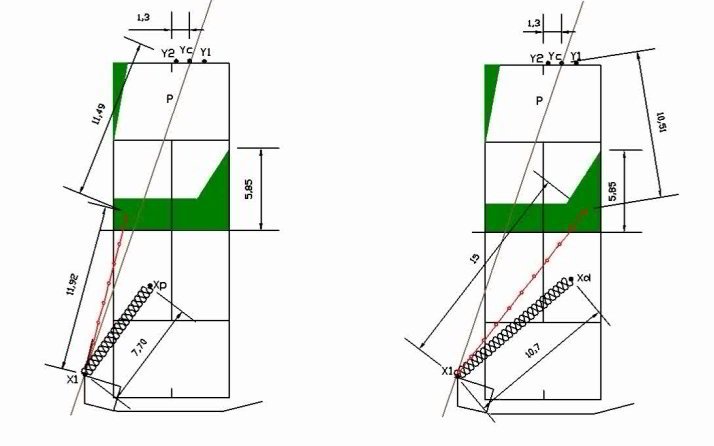
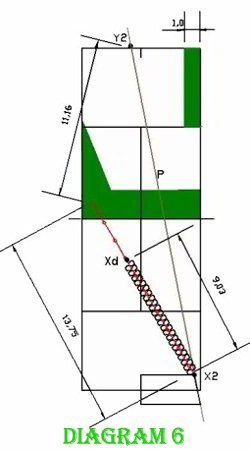
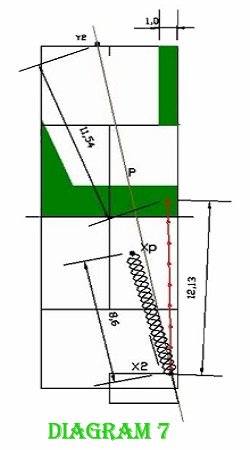
When the player moves 1.0 m (about 3 feet) forward from the baseline, the distance to the ball’s direction is 0.2 m (about a foot) less and the reaction time is less as well (depending on speed). When the player goes backward 1.0 m (about 3 feet) from the baseline, the distance from the player to the ball’s direction is 0.2 m (about a foot) more than when the player was on the baseline, and the reaction time is more, too.

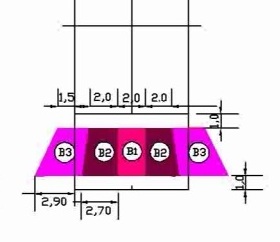
The analysis shows that the best receiver position is about a meter away from the court’s corner towards the court’s center when the server is about a meter from the court’s center.


Recommendations for Zone C

Zone C

Volley zone

Conditions:

  1. The ball is at X1
  2. The opponent is at Y1

Recommendations

1. Play a stop volley when you are close to the net;

2. Try to always reach the ball in shortest possible way;

3. When you play cross court, place the ball on the same or shorter distance from the net than your current position;

4. When the ball is low and close to the net never try to implement a top spin stroke.

Go to zone B

There are many different possible situations related to the  ball’s speed, direction, and bounce connected to your opponent’s position. The given recommendations are universal.

The ball’s speed for the volley stroke is less than the ground stroke but the reaction time of your opponent is about two times less. That’s is the advantage of using such strokes.

The varieties of the situations related with ball’s speed, ball’s direction, ball’s bounce as and opponent’s position are very much. The given recommendations are quite universal.

The ball’s speed of volley stroke is less than the ground stroke but the ball’s way and the time for reaction of your opponent is about two times less. That’s is actually the advantage of such strokes.

Recommendations for Zone B

Zone B

This is a transitional zone because after the stroke from there the players move to Zone A or C.

Subzone B1

First Case (see diagrams below)

The player implements a volley. From here generally the player hits a “first volley” when s/he moves to the net.

Recommendations

1. Play a deep ball because:
- if you play a drop shot, the speed of the ball is slow and the distance to the net is long (between 7 –11 m.) and it is easy for player Y to reach such balls.
- normally the speed of the ball coming to player X is high and therefore it will be difficult for the player to shorten the ball very well. Generally, an attempt for the player to play a short ball can lead to the loss of the point because the ball goes in the net or is not short enough and it is easy for the opponent to reach the ball.
2. If player X implements a low volley, player Y has to make 1-2 steps forward to the net. Doing that, player Y can easily reach the short ball. If the ball is deep, won’t be very difficult for player Y to reach the ball because the ball in such cases is slow.
3. When player X can attack, the direction of the ball has to be cross court.
4. In some cases when player X is next to the service line, at positions X1 or X2 and can not implement a wining shot, s/he can play in the center because after the stroke the player can easily close the court by moving forward.

Second Case (see diagrams above)

Conditions:

1.The ball is at position X1.
2. Player Y is at the center.

Recommendations

1. Player X has to move towards the net when s/he implements a drop shot because:

- after such stroke the ball's bounce is low and opponent Y can not hit the fast ball;
- player X has enough time to get into the best position while his/her opponent runs for the ball;
- player Y can not play a drop shot because player X will be close to the net.

2. Player X should play the drop shot ball cross court in order to maximize the distance the ball is from the opponent after the bounce.

Subzone B2

Conditions:

  1. The ball is at X1.
  2. The opponent is at Y1.

Recommendations

1. When you are close to position X1, the best decision is to play down the line rather than cross court because after the stroke you can get into the next best position faster and at the same time the opponent has to cover a longer distance in order to reach the ball.
2. If you play a drop shot, the best decision is again straight because the distance of the ball is less than if you play cross court and your opponent's distance to the ball is farther.
3. You can implement a winning shot cross court but the speed of the ball will be slower.
4. When the ball is at X1 the recommended opponent's position is at Y1 about 0.9 m (3 feet) from the center shown in the diagram above.

Subzone B3

First case (diagram below on the left)

Conditions:

  1. The ball is at X1
  2. The opponent is at Yp

Second case (diagram below on the right)

Conditions:

  1. The ball’s position is at X2
  2. The opponent’s position is at Yp

Recommendations

First case
1. When the ball is in a position close to X1 the best decision is to play down the line rather than cross court because after the stroke the player can get into the best position faster and, at the same time, the opponent has to go farther in order to reach the ball.
2. If you you play a drop shot the best decision is again to play down the line because the distance of the ball to the net is less than ball's distance cross court.
3. The recommended position of player Y is about 0.9 m (3 feet) from the center
Second case
1. When player hits the ball cross court it is better to go back than to go forward after the stroke because:
- the distance from position X1 where the ball is, to the next position on the net the player must move is almost 1.5 time farther than it would be to move to a position on base line;
2. From X1 the drop shot is better to play down the line.
3. The position of player Y2 is about 1.8 m from the center.
4. When the player can't implement a fast shot, when the ball's position is at X1, the best decision for him/her is to play a drop shot ball, because the distance of the ball is short, the distance to his/her next position is short and the distance to the opponent's next position is longer than his/hers.
5. The down the line zone is small and if the player prefers to play here he/she has to be sure that s/he will win the point directly.

Rally Zone A3 Recommendations

In this sub zone (in yellow color in the diagram ) we will only analyze decisions when your positions are X1 or X2.

The best places for the ball’s placement are indicaed in green.

First and most important from these positions, you should never direct the ball within the range of your opponent.

Recommendations

For this subzone the player can use all the recommendations written for sub zone A1 and A2.

Depending on your skills,

  1. For beginners and intermediate level players the best direction is cross court or a drop shot ball, close to the net.
  2. An advanced player can direct the ball down the line, cross court or drop shot.
  3. When the ball comes from cross court it is easier for the player to return the ball cross court. But the player has to place the ball on the other half of the court the same distance or less from the net. For example, if the opponent’s ball direction has crossed the sideline in your half 6 m (20 feet) from the net, your ball’s direction has to cross the sideline closer than 6 m (20 feet)  from the net. It is necessary in order for player “X” to have enough time to get to the next position, to take the advantage in this rally or to implement a wining shot. When does player “X” has the initiative in the rally? When after every stroke the player’s distances to his next positions are less than the opponent’s distances.
  4. When the ball comes from cross court and the player wants to direct the ball down the line, the head of the racket has to direct more inside of the court than to the place where he wants to play. There is a physics rule, the angle of incidence is equal to the angle of reflection and if the player wants the ball to be closer to the sideline and does not implement this rule, the ball will be out. Depending on the separate cases the player assesses the situation and decides how much more inside to direct the head of the racket. For the player it is the most difficult when the ball has a spin because the spin picks up the angle’s declination.
  5. If the player is at position X1 the position of the opponent is Yc 1.35 m aside from the center.
  6. From the position A1 player A can play down the line if:
  • the player can attack;
  • the opponent moves to the net;
  • the opponent is close to the corner of the court (position Y1 on the diagrams below).

Rally Zone A2 Recommendations

Tennis Court Sub Zone A2

From this subzone the player can take the initiative or directly to win point.

Let’s look at diagram 4. If you play cross court from position X2 and your opponent is in on position Y2, he has to cover almost twice the distance in order to hit the ball than you have to cover in order to be in the correct position.

  1. Advantages you to play cross court are:
    – This zone is bigger than if you play down the line;

– You have to cover the shortest distance to be in the next correct position;

– The ball passes over the net in almost the lowest place that is close to the center of the net.

  1. Disadvantages to playing here are:

– The maximum possible speed of the ball will be less than the ball’s speed if you had played down the line because of the topspin or slice shot that you have to implement;

– At position Y21 on diagram 4 your opponent has the maximum angle to attack you.

If the ball’s placement is in the green zone you have a greater chance your shot to be a wining shot.

In Diagram 5 you are in the X2 position and you will play down the line. That’s a perfect decision but in order to implement a wining shot:
– You have to have a really accurate shot because this zone is the smallest one, and/or;
– Your opponent has to not be in the correct position. For example, close to the corner of the court.
1. Advantages if you play down the line are:
– You can implement a faster shot than if you play cross court;
– Sometimes you can move foreword and play a volley.
2. Disadvantages to playing down the line are:
– This zone is the smallest one and requires an accurate shot;
– The distance to the next correct position is almost twice as long than if you had played cross court;
– The ball passes over the net in the highest place.

Recommendations

1.When the ball is in zone A2, inside of the court and if the player can attack, it is preferable that the player plays down the line /straight/ and plays cross court in any other cases.
2. If your opponent can hit the ball from the position that is closest to the the corner of the court (Diagram 2 position ``X2``), your position has to be 0.8 m from the court's center (on the ``Y2`` on the diagram). In the Diagram 3 it is the same but from the opposite side.
3. In Diagram 2 and 3 the green indicates the recommended zone(s) where you have to play in order to implement a wining shot when you are in zone A2.
4. Sometimes it is a good decision to play a drop short ball, close to the net from sub zone A2. In this case, it is equi-distant to play cross court or down the line. We recommend that you play such shot mostly when you play on a clay court, you have good skills to implement such a shot and for the element of surprise.
5. When you have to hit the ball from position X2, the recommended opponent's position Y2 is about 0.8 m (2 - 3 feet) from the center on the opposite court's side.
Go to sub zone A3

Rally Zone Recommendations

Explanations

1. Where is the best ball direction and placement from any given position?

Without any specific game situation, it is obvious that the best scenario is when the distance that player, who hit the ball, has to cover the shortest distance from his current location to his next location and the same distance for his opponent is maximum.

2. What is a cross court ball?

You have played a cross court ball when the ball crosses the sideline of the opponent’s half of the court.

3. In all of the diagrams, the zones from which the player has to hit the ball are in yellow.

4. Recommended zones and ball directions where the same player has to play are indicated in green.

5. In each diagram the ball’s position from where the player has to hit the ball is marked as “X” and the receiving player’s position is marked with “Y”.

6. In all the diagrams you will see the recommended receiving player’s position “Y” in meters.

Recommendations
1. Play the ball in the green zone to keep your opponent far from the net.
2. Do not play a short ball because the distance to the net is the longest and the opponent can easy to reach the ball.
3. If you have to play ball from the position close to a sideline corner, play it cross court. After the stroke you will be close to your next position and the zone is much bigger than if you just play straight. You will find a more in depth explanation in the next pages.
4. When you have to hit the ball from position X1 the recommended opponent's position Y1 is about 1.1 m (3 - 4 feet) from the center on the opposite court's side.
Zone A2

Court Positions | The Most Important

Below you will find unique diagrams that I have made thanks to my knowledge as an engineer. All court positions are mathematically proven.

Here we offer some tennis court diagrams for the player’s position when he/she plays from each of the different subzones. You will also find recommended positions for the player after he/she has played the ball in the shown direction.

In all diagrams:

–  X is the point where player hits the ball;

– Y is the position where the player has to wait for the ball from point X.

Recommended positions:

1. The ball is in the center of the court (X).

In this case, the best waiting position for the player must be at the center (Y).

2. The ball is located in the corner of the court (X).

The player’s best position is about 90 cm (3 feet) from the center of the opposite half of the court (Y).

3. The ball is located 2 meters (6 feet) from the single sideline (X).

The player must be on position about 135 cm (4-5 feet) from the center of the court in the opposite half (Y).

4. When the player who serves is about 1 m (3 feet) from the center of the court.

The position of the player who receives the ball should be about 1.10 m (3 – 4 feet) from the single sideline of the court.

5. When a player serves from the corner of the single court (X).

The player who receives the serve has to be at the corner of single game court (Y).

6. When the ball is at the corner of the single court or in the alley.

Recommended direction for the ball  is cross court  (in the scheme colored in blue) because:

– The zone is greater, allowing a non-precision shot and after the stroke the player X can  quickly move into the next recommended position on the court (again colored blue), which allows him/her to cover the maximum portion of his/her half of the court.

Rights (indicated in red in the second diagram) can be played in two cases – firstly, when a player who receives the ball Y is not in the position where it should be (for example is on Y1), and is standing near the corner of the court on the opposite half and, secondly, to use the element of surprise. The diagram indicates in red where the player has to move after s/he has played into the red zone. This position is about 2 m (6 – 7 feet) from the position where the player had played cross court.

7. In this diagram, the recommended ball directions are shown and the zones from the right side when the player is in zone A2 and from the left side are symmetrical.

8. The diagram below shows the recommended zones for when the ball is played from the central part of the court – A2.

From this position it is better to play deep balls cross court and closer to the baseline.

9. From the shown sub zone it is most important to play the ball in the direction and/or manner so that, after the stroke is made the player has time to go to the next position on the court.

What does this mean? It means the player has to place the ball far away from the opponent in order to have time to move to the next position. From this position the player should never play the ball close to his/her opponent. The position shown in bue on the diagram shows recommended zones of where to place the ball from this position.

Back to Top
Product has been added to your cart